Perhaps you remember those days when you have been a child and nearly all things appeared ’new‘ to you. Turning the light on. Making fire. Climb a staircase. Riding a scooter. …. To some degree it can happen in your present again: learning to drive a car; learning to cook a meal; learning to play an instrument; …
All these examples have something in common:
There is a ‚given situation‘, a ‚NOW‘.
You have some experience that ‚things can change‘ and how.
You want to ‚produce change by yourself‘.
You apply some ‚possible actions‘ in the given situation (onto your NOW).
You experience either ‚it does not work‘ or you experience is ’something happens‘.
That, what ‚happens‘ is either ‚known to you‘ or ‚unknown‘; in the last case you can call it ’new‘. ‚Known to you‘ means ‚confirmation‘ of what you know already. ‚New‘ to you means ‚expanding your knowledge space‘.
Sometimes you have not yet an idea about a possible action onto the NOW. Then you have to ‚invent‘ some ’new‘ action to try.
If you will no have new inventions the world will stay ‚old‘ in your mind (but probably not in the world outside your mind).
These statements circumscribe a little bit your ’subjective experience‘ being in a given situation and interacting with your NOW. We can translate these experiences in a kind of a ’schema‘, an ‚pattern for experiments‘ in the following way:
Write a text, which describes a given state, where you are in. Let us call this our assumed NOW.
Write a text, which describes a possible state which you want to reach some time ahead. Let us call this our assumed GOAL.
Write a text, which describes possible actions, which are assumed to be able to change the NOW step by step in a way, which generates after finitely many steps a situation, which is sufficient similar to our GOAL (A ‚possible action‘ is either already known to you or you have to invent some). We call this our PLAN.
Take these texts (NOW, GOAL, PLAN) and try to ‚realize‘ the listed actions in your given NOW if possible.
After every action check, whether the ’new NOW‘ has sufficient similarities with the planned GOAL. If yes, you can stop, otherwise you have to continue.
After a finite set of realizations of actions (the realization of your PLAN) you have either reached your GAOL or not. In the first case you can say, that your experiment was successful; the whole procedure lead you to the goal. Otherwise the experiment was not successful; you didn’t reach your goal.
In the case of a not successful experiment you can think about it: why was it not successful? This negative result challenges your previous knowledge. This is the only chance you have, to ‚free you‘ from ‚old‘ knowledge to ‚improve it‘ by ‚changing it‘.
Triggered by an interesting master thesis of a student writing about a Robo-Car which is using a raspBerry Pi experimental board, I decided to start myself with some experiments.
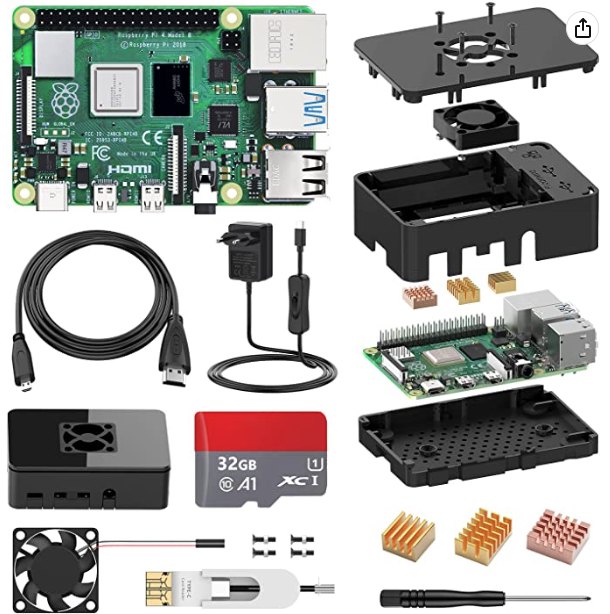
Instead of starting directly with the raspBerry Pi organisation [1] I checked the internet and came up with a package like this: STUUC Raspberry Pi 4 Model B 8GB Ram with 32GB Memorycard, Raspberry Pi 4B Kit with Quad-Core A72 supporting Dual Display 4K/WiFi 2.4G.5G,LAN 1000Mbps/ BT 5.0/USB3.0 all Parts included.
This was all I had; no further explanations. To put all these parts together, purely mechanically, wasn’t such a problem. But this is not what you want. You want a working computer. With the following steps it worked out nicely:
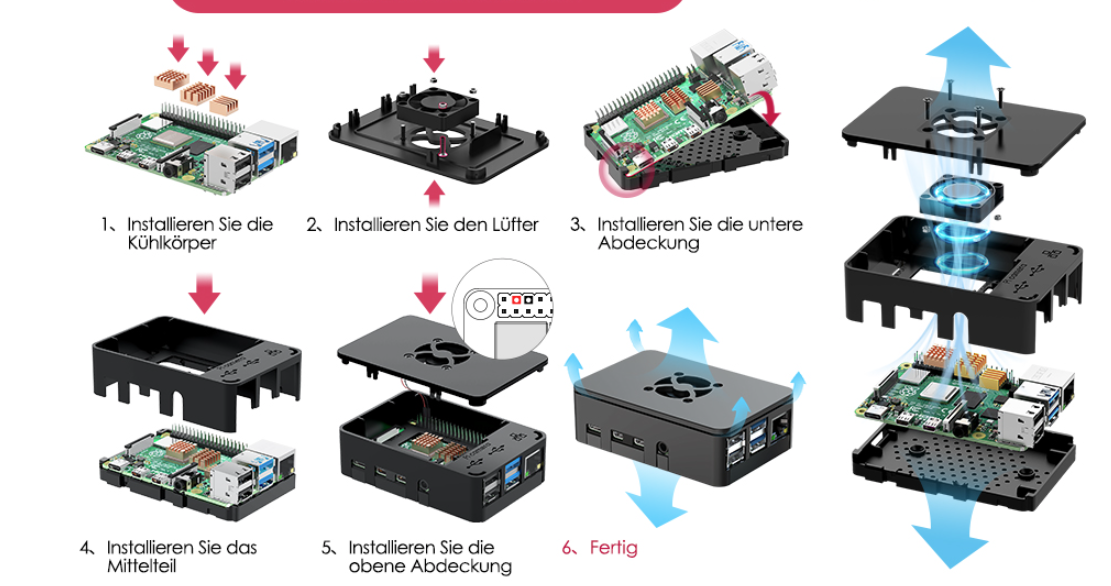
I put the cooling elements (the ‚heat sinks‘) on the determined parts by pressing them onto the surface, after I have pulled the protective layers off.
I put the board into the ground cover.
Then I put the micro-SD card (32 GB) into a small slot left on the board (there is only one) with the inscriptions of the SD card below (otherwise it will not enter the slot).
Then I inserted the power supply in the USB-C slot, the screen with the HDMI cable to the left micro HDMI slot, the mouse and the keyboard to the 2 left USB-2 slots.
Then I attached the middle cover on the board.
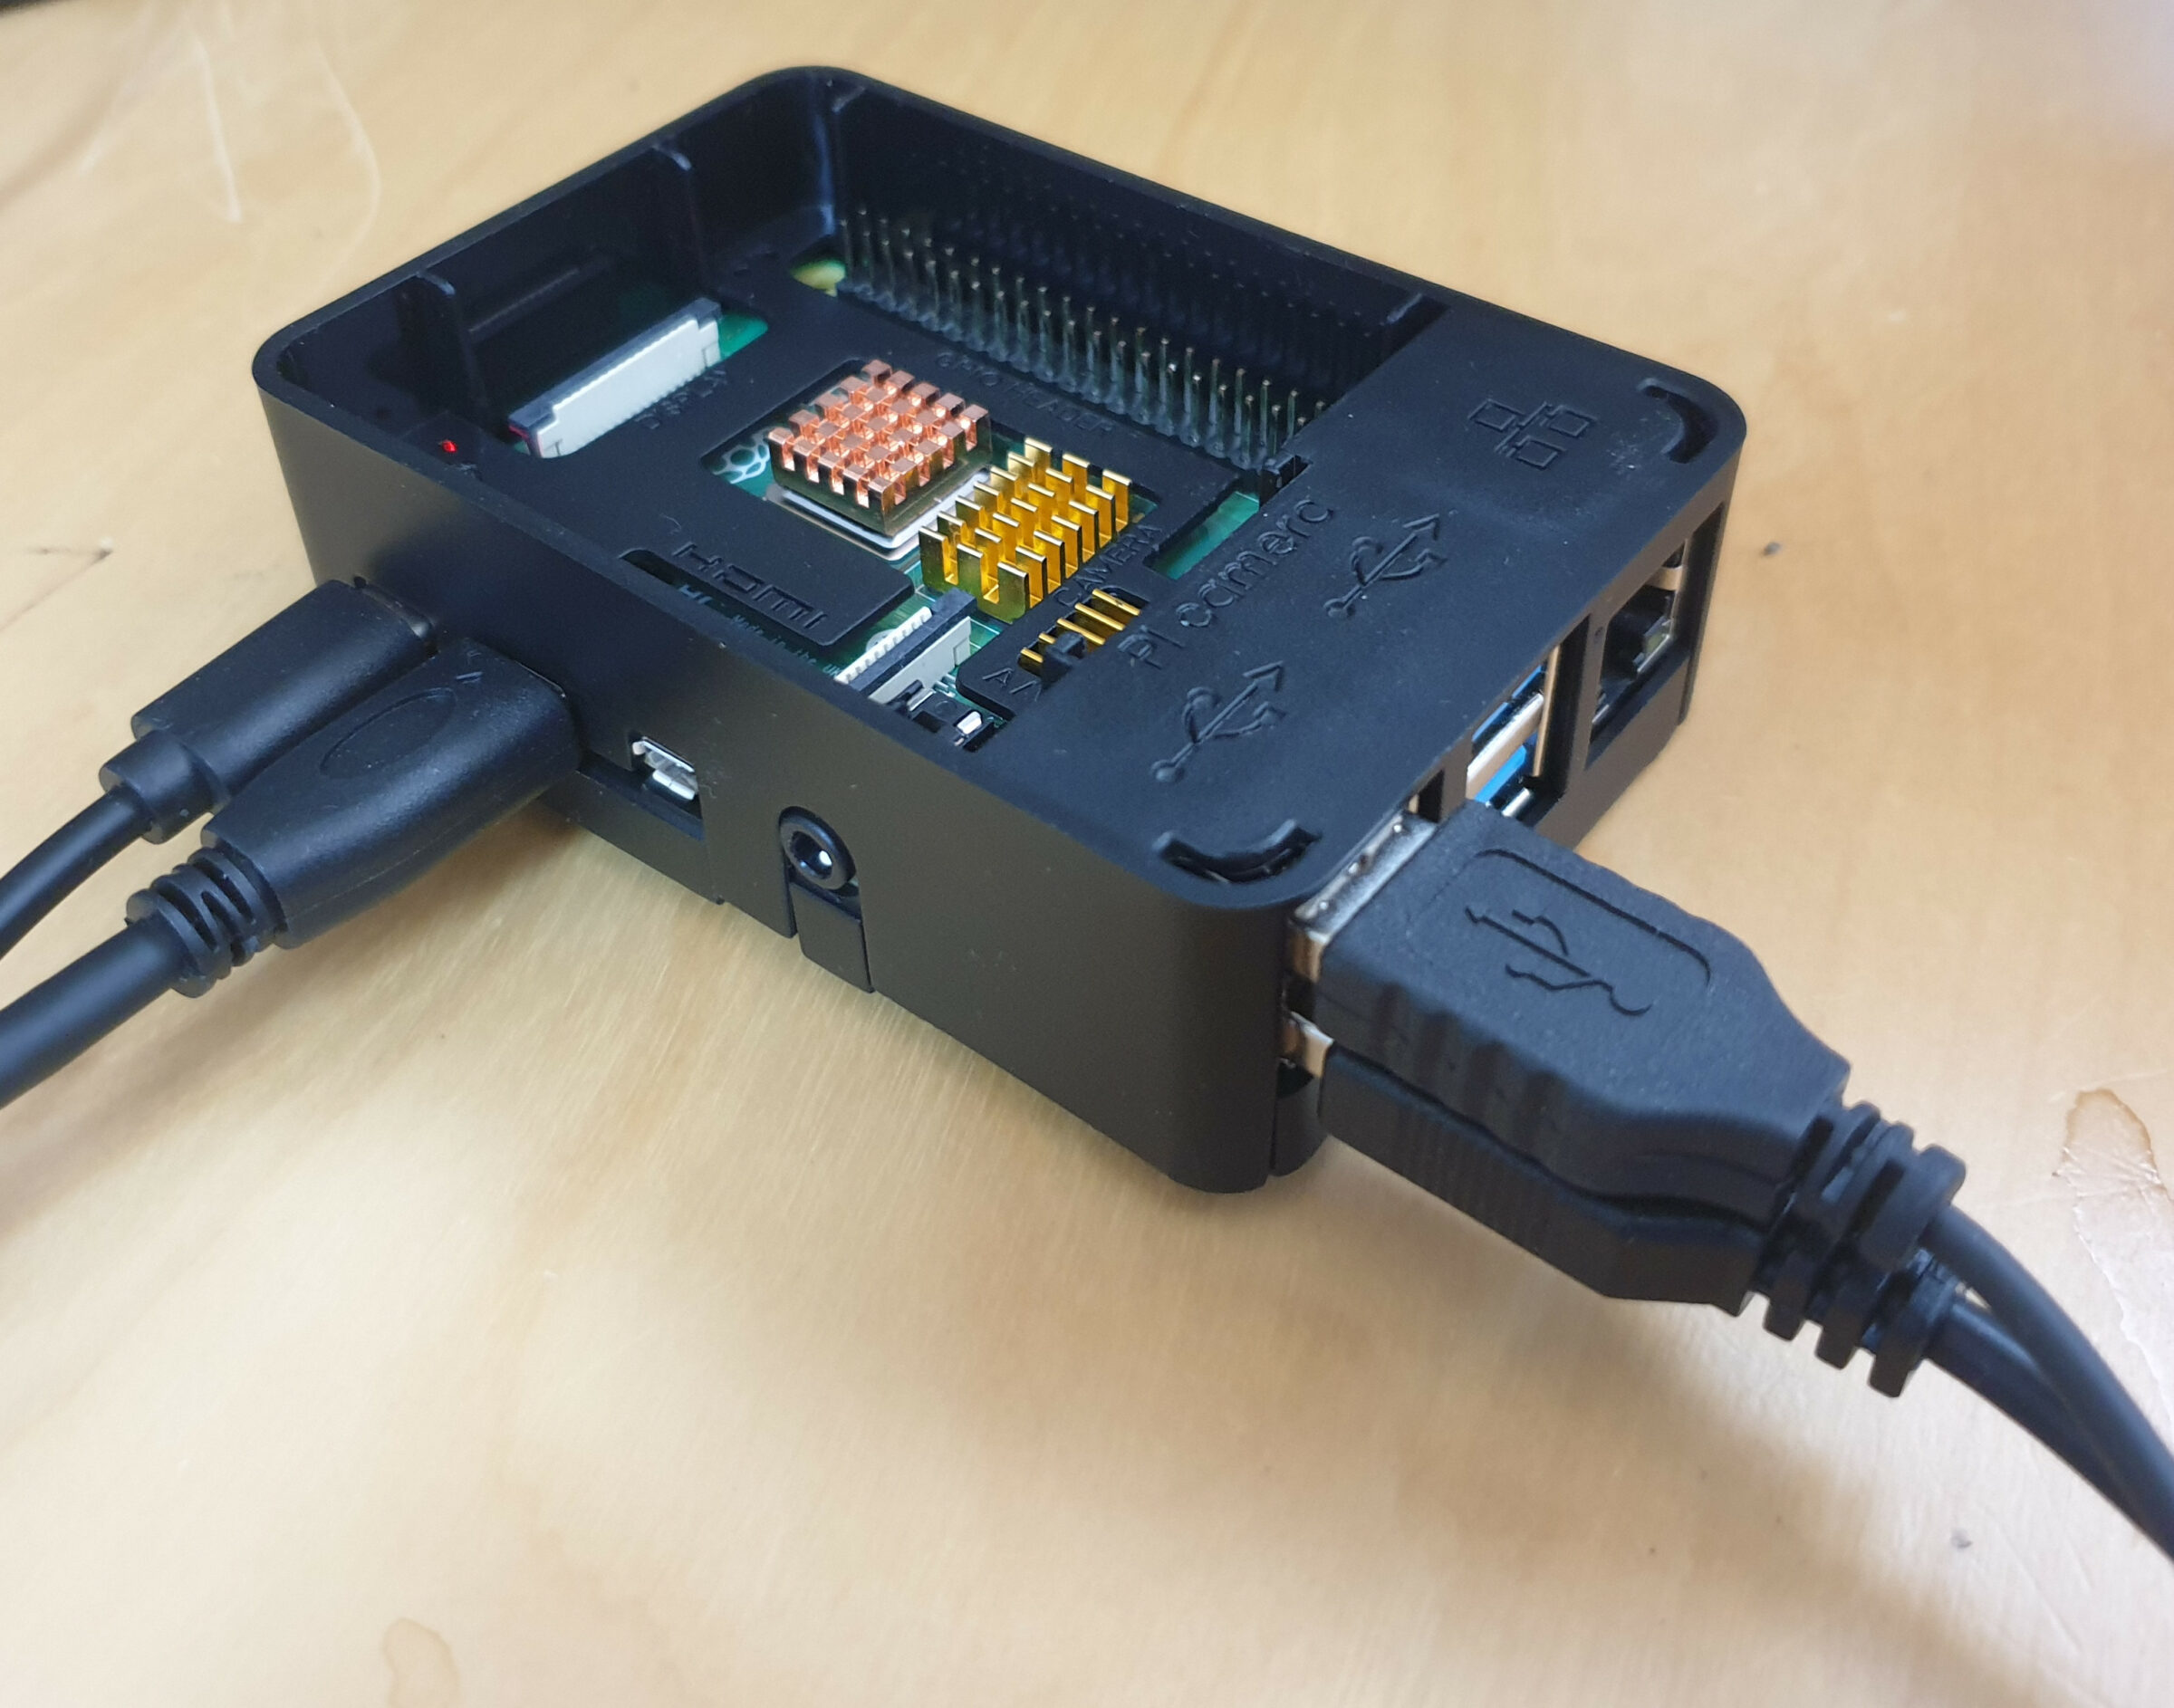
raspBerry Pi experimental board with ground- and middle cover. Left the USB-C connector with the power supply, one micro-HDMI connector with the screen, and the two USB-2 connectors with the mouse and the keyboard.
Then I switched the experimental board on.
The screen became active but the text appearing on the screen told me, that the software is too old, and this message started to repeat …
I pulled the micro SD card out again, transferred it with an SD-card adapter into an old SD-card reader, connected it to my unix-machine (a windows machine would also work) and activated the raspBerry site where the raspBerry Pi software is described.[2]
From this site you can download the ‚Raspberry Pi Imager‘ which is a very nice program. If You start it (linux as well as windows) you can download the newest version of the raspBerry Pi operating system on your SD card, pull them out and insert it again in your raspBerry Pi board.
Starting again with the new version, now it worked fine. Connected to the internet via Ethernet or Wlan you can update everything and then you can start working.
With the free USB-3 connectors you can connect other SD-card memories or even large USB-drives … and much more.
Adding a camera
For the experiments-chapter I will need a camera. Here you can get first information about the raspberry Pi’s cameras. I decided to take the new camera which offers a lot of capabilities.
The raspberry Pi camera module 2 with 8 MP (Mega-Pixels). I took the photo from the new camera with my smartphone, connected the smartphone with an USB cable to the raspberry Pi board and copied the photo onto the raspberry Pi. On the raspberry Pi I could format the Photo with the free gimp-software (which is not really necessary, but helpful) and loaded it up with my word-press blog software.
The specialty of the raspberry Pi’s cameras is that these are fully integrated in the hardware and software of the raspi.This enables completely new applications compared to a ’normal‘ camera which is only attached by an USB connector. This full integration is possible because there exists a whole bunch of software called in the older version ‚raspicam‘, now ‚libcamera‘, which can be used to work with the signals of the camera. The original sources for the camera are written in C++, but the user can interface with the camera by so-called camera-apps which offer complex functions for direct use, and one can write own camera-apps. But because the most used programming language on the raspi is the programming language python, there existed since the beginning a python library called ‚picamera‘ provided from the ‚outside‘ of the raspi development team. With the publication of the new raspberry Pi processor accompanied by a new version of the operating system (linux) called ‚bullseye‘ the old python picamera library doesn’t work any longer. One can still use it, but the future has another direction. The new ‚philosophy‘ of the rasp development team is nicely described in this ‚readme document‘ attached to the new version of the camera software called ‚libcamera‘:
„A complex camera support library for Linux, Android, and ChromeOS
Cameras are complex devices that need heavy hardware image processing operations. Control of the processing is based on advanced algorithms that must run on a programmable processor. This has traditionally been implemented in a dedicated MCU in the camera, but in embedded devices algorithms have been moved to the main CPU to save cost. Blurring the boundary between camera devices and Linux often left the user with no other option than a vendor-specific closed-source solution.
To address this problem the Linux media community has very recently started collaboration with the industry to develop a camera stack that will be open-source-friendly while still protecting vendor core IP. libcamera was born out of that collaboration and will offer modern camera support to Linux-based systems, including traditional Linux distributions, ChromeOS and Android.“
To write a completely new camera software in python is not a simple task. Therefore it needed some time to develop it and it is still not completely finished. But, luckily, the first experimental releases are there and do already function to some extend. While the messages from the development team in November 2021 have been rather announcements only, the massages from February 2022 sound differently. Now a new — yet still experimental — software is available by download from the github server. The new name of the old picamera library is ‚picamera2‘ and it is developed now by the raspi development team directly. Here you can find a download for the picamera2 document, which describes the whole library with installation descriptions.
Here you can look to a 10s video taken with the new camera modul 2 with the new — still experimental — python library picamera2:
from picamera2 import Picamera2 picam2 = Picamera2() picam2.start_and_record_video(„test.mp4“, duration=10)
Small 10s test video with functions of the new picamera2 python library.
configure-tool
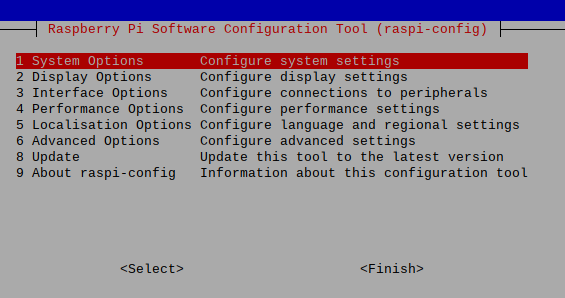
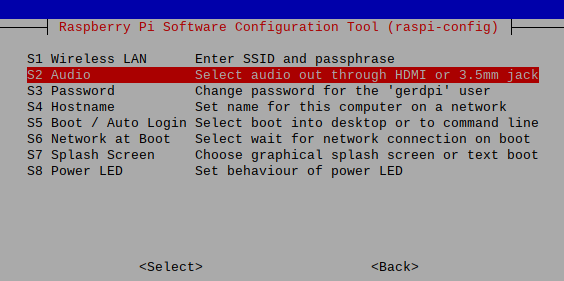
The simplest way to configure the raspberry Pi after the installation is to call the rasp-configure tool by typing into the shell:
gerdpi@raspberrypi:~ $ sudo raspi-config
Then the following screen will show up:
If you will use the audio-jack for your headphones instead of the loudspeaker of your screen you can select on the main screen 1. System options and then
you can select S2 Audio to make your choice.
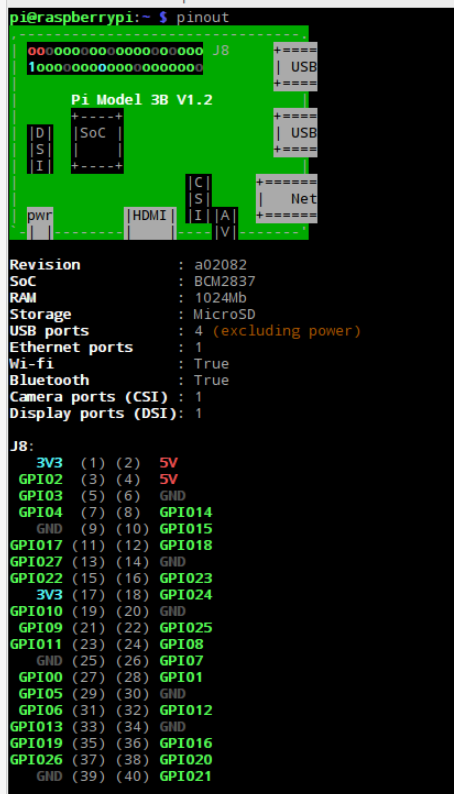
GPIO-settings
If you want later define some settings on the general input-output (GPIO) you can do this. Here is the GPIO outline:
[2] raspBerry Pi organization, software: https://www.raspberrypi.com/software/ or here, more simpler: https://projects.raspberrypi.org/en/projects/raspberry-pi-setting-up/1
The raspberry PI Prozessor [1], nicely embedded in a simple but powerful board, seems to be a universal tool to integrate knowledge about hardware, the linux operating system, a huge space of available software, many programming languages, and a whole bunch of additional electronic components allowing lots of interesting experiments.
On this site it will be explored how one can built up step by step experiments attached to the topic of ‚learning‘.
Python
There are today more than 100 programming languages around. Every has their own merits. In the realm of ‚learning‘ and close to hardware applications the programming language ‚python‘ has some popularity.[2] Therefore we will use this language here.
Experiments
Having hardware, knowing a programming language, playing with ideas — this all can only awake to some real experience when it will be transformed to some working system which allows real experiments. This shall be happen on this site. The Order of experiments is completely driven by ‚curiosity‘ and by ‚uprising questions‘.
A first series of tests have been realized with fixed-rule actors and
random-rule actors. The results show, that there is no clear correlation
between the mean amount of energy and the death-rate of an actor
(-0.78 fixed rule Actor), (-0.71 random rule actor). Between the death-rates of both actors we have a correlation of -0.18, and between the
mean energy of both actors a little bit positive correlation of 0.05.
1 Discussion
A first experiment has been realized with the version of the program named ae6-2-6-main.py.
This program offers the following options for the user:
1. Which kind of behavior (fixed-rule, random-rule)
2. Size of grid (n x n)
3. Percentage of obstacles in the grid (default is 20)
4. Percentage of food in the grid (default is 5)
5. Amount of cycles for one run
6. Amount of repetitions of runs
7. Debug mode (clicking with the mouse after every step) or not
8. Duration of sleeping between steps (if no debug mode)(0 – 5 sec)
9. Manual or random determination of start position
The output is a graph showing the mean energy consumed, the death
rate per run, the percentage of energy level per run, the percentage of
obstacles and food to the grid area.
All these options of the program have been tested. Everything worked
fine. Only in the complete automatic mode (with automatic start positions)
the program crashed with spyder in the case of the random rule actor.
Repeating these tests directly from the Linux-Shell with the directory
path ’ /Dokumente/EMP/SW/PY-PROGRAMS/A-E-6-2$’ and the command ’python3 ae6-2-6-main.py’ everything worked fine. No problems. Thus it seems that the error is an artifact caused by the spyder-software.
1.1 Expectations
In this experiment the following options have been activated:
1. Either behavior type 1 or 2
2. Using the grid sizes 7 – 9 – 11 – 15
3. In parallel using the amount of cycles with 50 – 70 – 90 – 130
4. In all cases 10 repetitions
5. No-Debug, Sleep-time 0 sec, automatic determination of start position.
6. For every type of behaviour with a certain amount of cycles the experiment has been done 3 times.
With these assumptions does the abbreviation ’T1-7-50-10-R1’ mean
that this experiment used type 1 of behaviour, grid-size was 7×7, amount of cycles was 50 with 10 repetitions, and this was experiment 1 of three.
In case of the fixed-rule actor the amount of the death-rate depends directly from the fact, that the right-hand rule allows a path, where there is no single food object. The size of the grid and the percentage of objects and food does not matter. The only influence can be that the positive paths can have until 4 food interactions; this can increase the amount of mean energy.
In the case of the random-rule actor the death-rate depends from the
fact, that a random path is completely open. Even if a random actor hits
lots of food-objects this does not guarantee a death-free path. The only
influence can be that the length of the path increases the probability to hit
a food object.
1.2 Results
The results show, that there is no clear correlation between the mean
amount of energy and the death rate of an actor (-0.78 fixed rule Actor),
(-0.71 random rule actor). This confirms the expectation above.
Between the death rates of both actors we have a correlation of -0.18,
and between the mean energy of both actors a little bit positive correlation
of 0.05. That there are slight correlations between the death-rates of both
actors and even more between the mean energies is also confirming the
expectations. Because both actors depend from the same configuration
and where the proportion between objects and food is stable with regard
to the whole grid it is only the length of the path which varies, and this can
increase the amount of energy while the death-rate keeps its uncertainty.
1.3 Consequences
This simple setting demonstrates that an input output system whose only
interactions with the environment are fixed or random movements which occur independent of the actual context as well as interaction with food when the actor hits the food directly is highly uncertain in its overall outcome.
To improve the success of an actor one has to provide some kind of an
internal representation of the environment inside the actor in a way which
allows an exploitation of those properties of the environment which support more success in terms of energy and low death-rates.
Another dimension could be the generation of offspring under certain
successful runs. Offspring would generate some kind of a population which
implies new kinds of constraints.
emerging-mind lab (EML) eJournal ISSN 2567-6466 29.Nov. 2017 info@emerging-mind.org Author: Gerd Doeben-Henisch EMail: gerd@doeben-henisch.de FRA-UAS – Frankfurt University of Applied Sciences INM – Institute for New Media (Frankfurt, Germany)
This small software package is a further step in the exercise to learn python3 while trying to solve a given theoretical problem. The logic behind this software can be described as follows:
This software shall be an illustration to a simple case study from the uffmm.org site. The text of the case study is not yet finished, and this software will be extended further in the next weeks/ months…
The base-version of this software offers the user a menu-driven start to define a simple test-environment where he can investigate the behaviour of (yet) simple actors. At the end of a test run (every run can have n-many cycles, there can be m-many repetitions of a run) a simple graphic shows the summarized results.
The actual actors are without any kind of perception, no memory, no computational intelligence, they are completely driven either by a fixed rule or by chance. But they are consuming energy which decreases during time and they will ‚die‘ if they can not find new energy.
A more extended description of the software will follow apart from the case study as well as within the case study.
The immediate next extensions will be examples of simple sensory models (smelling, tasting, touching, hearing, and viewing). Based on this some exercises will follow with simple memory structures, simple model-building capabilities, simple language constructs, making music, painting pictures, do some arithmetic. For this the scenario has to be extended that there are at least three actors.
By the way, the main motivation for doing this is philosophy of science: exercising the construction of an emerging-mind where all used parts and methods are know. Real Intelligence can never be described by its parts only; it is an implicit function, which makes the ‚whole‘ different to the so-called ‚parts‘. As an side-effect there can be lots of interesting applications helping humans to become better humans 🙂 But, because we are free-acting systems, we can turn everything in ins opposite, turning something good into ‚evil’…
emerging-mind lab (EML)
eJournal ISSN 2567-6466
3.Nov 2017
info@emerging-mind.org
Author: Gerd Doeben-Henisch
gerd@doeben-henisch.de
FRA-UAS – Frankfurt University of Applied Sciences
INM – Institute for New Media (Frankfurt, Germany)
November 3, 2017
This article shows the final configuration of the base camp of our
Planet Software expedition for to built up an emerging-mind lab (EML).
In the following articles we will use this for our work. Probably there
will be many Changes in the future . Planet Software is an infinite project …
The Final Configuration
Program Icons on the left Bar of the window for the Planet Software 3.Nov.2017
1. Actual Programs on the Machine (standard)
2. File-Manager (standard)
3. Web-browser firefox (standard)
4. System Settings (standard)
5. FTP-program filezilla
6. File-Manager krusader with parallel directories
7. IDE spyder for working with python3
8. terminal program to allow console commands
9. LaTeX-Typesetting with TEXStudio
10. Media-Streamer vlc
11. Simple writer program gedit
12. Screen-Recorder simplescreenreader
13. Ubuntu Packet-Manager synaptic
14. Screenshots with shutter
15. Image Post-Processing (and much more) with gimp
16. Office Suite open office (soffice)
emerging-mind lab (EML) eJournal ISSN 2567-6466 31.Oct – 2.Nov 2017 info@emerging-mind.org Gerd Doeben-Henisch gerd@doeben-henisch.de FRA-UAS – Frankfurt University of Applied Sciences INM – Institute for New Media (Frankfurt, Germany) November 2, 2017
Contents
1 Why an Update (of ubuntu 14.04)? 2
2 Download And Install Ubuntu 14.04 3
3 Prepare The SW Environment 3
4 Terminal, Packet-Manager ’Synaptic’ 4
5 Manage Programs 5
6 Type Setting with TEXStudio 5
7 File-manager ’Krusader’ 6
8 Open Office Suite (e.g. for Drawing) 6
9 Simple Editor ’gedit’ 8
10 Screen-shots with ’shutter’ 8
11 Image Post-Processing with ’gimp’ 8
12 Python2+3, spyder3
13 Recording with the ’simplescreenrecorder’ 10
14 Video-Streamer ’vlc’ 11
15 Speech Synthesis with ’espeak’ and ’pyttsx’ 11
16 Ubuntu 14 and Windows 10 as Environment for Python3 12
17 Opting for ubuntu 16.04 besides ubuntu 14.04 12
18 Rebuild the Environment with ubuntu 16.04 13
OVERVIEW
The original plan was, to set up under ubuntu 14.04 a program-
ming environment which can use python3, spyder3 and as additional
software a speech-synthesis software like pyttsx. While everything
worked fine (see the first part of this article), it came to a ’show down’ when trying to combine python3 under ubuntu 14.04 with spyder3 and pyttsx3. All trials to overcome the problem led to new problems (see below). Finally I decided to give up the axiom of having ubuntu 14.04 on account of ros (robot operating system), because the primary tool is in this phase the programming language python. Python offers a ’universe of concepts’ on its own. And, who knows, there will be a day where ros will work with ubuntu 16.04 too :-). Then I installed ubuntu 16.04 (as upgrade from the internet) and checked the combination of python3, spyder3 and pyttsx3. It worked.
The pages 1-15 of the article describe a first update still using
ubuntu 14.04. Then it came to the crash when trying to combine python3 + spyder3 + pyttsx3. This led to the upgrade to ubuntu 16.04 and the new story. Before it came to the upgrade there was an important interaction with windows 10 helping to understand some limits and possibilities.