Perhaps you remember those days when you have been a child and nearly all things appeared ’new‘ to you. Turning the light on. Making fire. Climb a staircase. Riding a scooter. …. To some degree it can happen in your present again: learning to drive a car; learning to cook a meal; learning to play an instrument; …
All these examples have something in common:
There is a ‚given situation‘, a ‚NOW‘.
You have some experience that ‚things can change‘ and how.
You want to ‚produce change by yourself‘.
You apply some ‚possible actions‘ in the given situation (onto your NOW).
You experience either ‚it does not work‘ or you experience is ’something happens‘.
That, what ‚happens‘ is either ‚known to you‘ or ‚unknown‘; in the last case you can call it ’new‘. ‚Known to you‘ means ‚confirmation‘ of what you know already. ‚New‘ to you means ‚expanding your knowledge space‘.
Sometimes you have not yet an idea about a possible action onto the NOW. Then you have to ‚invent‘ some ’new‘ action to try.
If you will no have new inventions the world will stay ‚old‘ in your mind (but probably not in the world outside your mind).
These statements circumscribe a little bit your ’subjective experience‘ being in a given situation and interacting with your NOW. We can translate these experiences in a kind of a ’schema‘, an ‚pattern for experiments‘ in the following way:
Write a text, which describes a given state, where you are in. Let us call this our assumed NOW.
Write a text, which describes a possible state which you want to reach some time ahead. Let us call this our assumed GOAL.
Write a text, which describes possible actions, which are assumed to be able to change the NOW step by step in a way, which generates after finitely many steps a situation, which is sufficient similar to our GOAL (A ‚possible action‘ is either already known to you or you have to invent some). We call this our PLAN.
Take these texts (NOW, GOAL, PLAN) and try to ‚realize‘ the listed actions in your given NOW if possible.
After every action check, whether the ’new NOW‘ has sufficient similarities with the planned GOAL. If yes, you can stop, otherwise you have to continue.
After a finite set of realizations of actions (the realization of your PLAN) you have either reached your GAOL or not. In the first case you can say, that your experiment was successful; the whole procedure lead you to the goal. Otherwise the experiment was not successful; you didn’t reach your goal.
In the case of a not successful experiment you can think about it: why was it not successful? This negative result challenges your previous knowledge. This is the only chance you have, to ‚free you‘ from ‚old‘ knowledge to ‚improve it‘ by ‚changing it‘.
Triggered by an interesting master thesis of a student writing about a Robo-Car which is using a raspBerry Pi experimental board, I decided to start myself with some experiments.
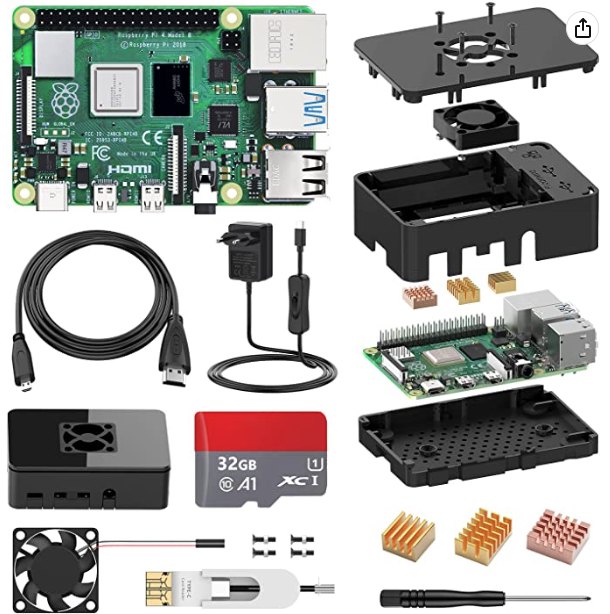
Instead of starting directly with the raspBerry Pi organisation [1] I checked the internet and came up with a package like this: STUUC Raspberry Pi 4 Model B 8GB Ram with 32GB Memorycard, Raspberry Pi 4B Kit with Quad-Core A72 supporting Dual Display 4K/WiFi 2.4G.5G,LAN 1000Mbps/ BT 5.0/USB3.0 all Parts included.
This was all I had; no further explanations. To put all these parts together, purely mechanically, wasn’t such a problem. But this is not what you want. You want a working computer. With the following steps it worked out nicely:
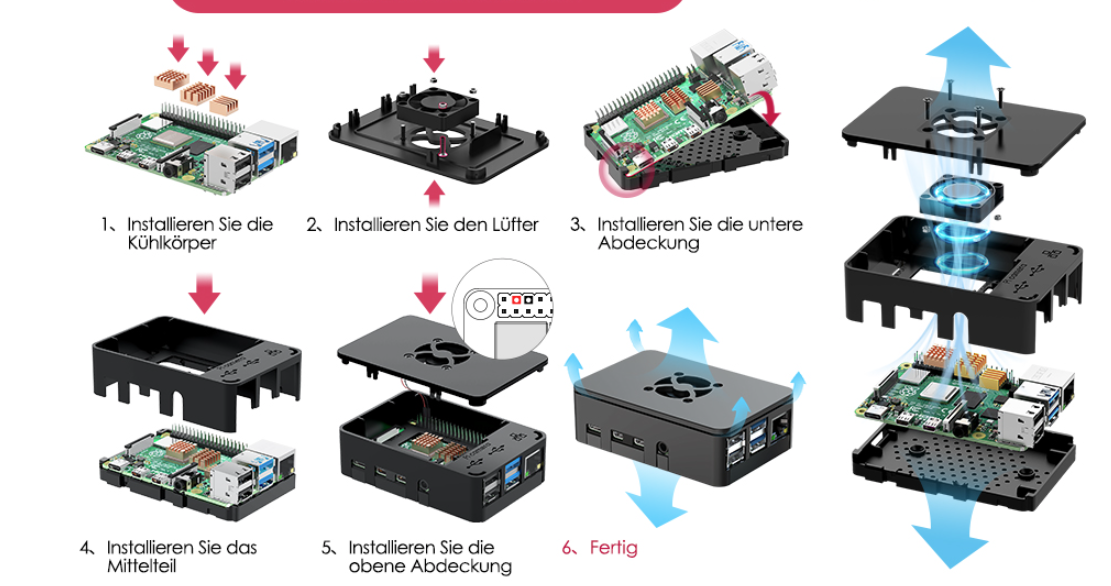
I put the cooling elements (the ‚heat sinks‘) on the determined parts by pressing them onto the surface, after I have pulled the protective layers off.
I put the board into the ground cover.
Then I put the micro-SD card (32 GB) into a small slot left on the board (there is only one) with the inscriptions of the SD card below (otherwise it will not enter the slot).
Then I inserted the power supply in the USB-C slot, the screen with the HDMI cable to the left micro HDMI slot, the mouse and the keyboard to the 2 left USB-2 slots.
Then I attached the middle cover on the board.
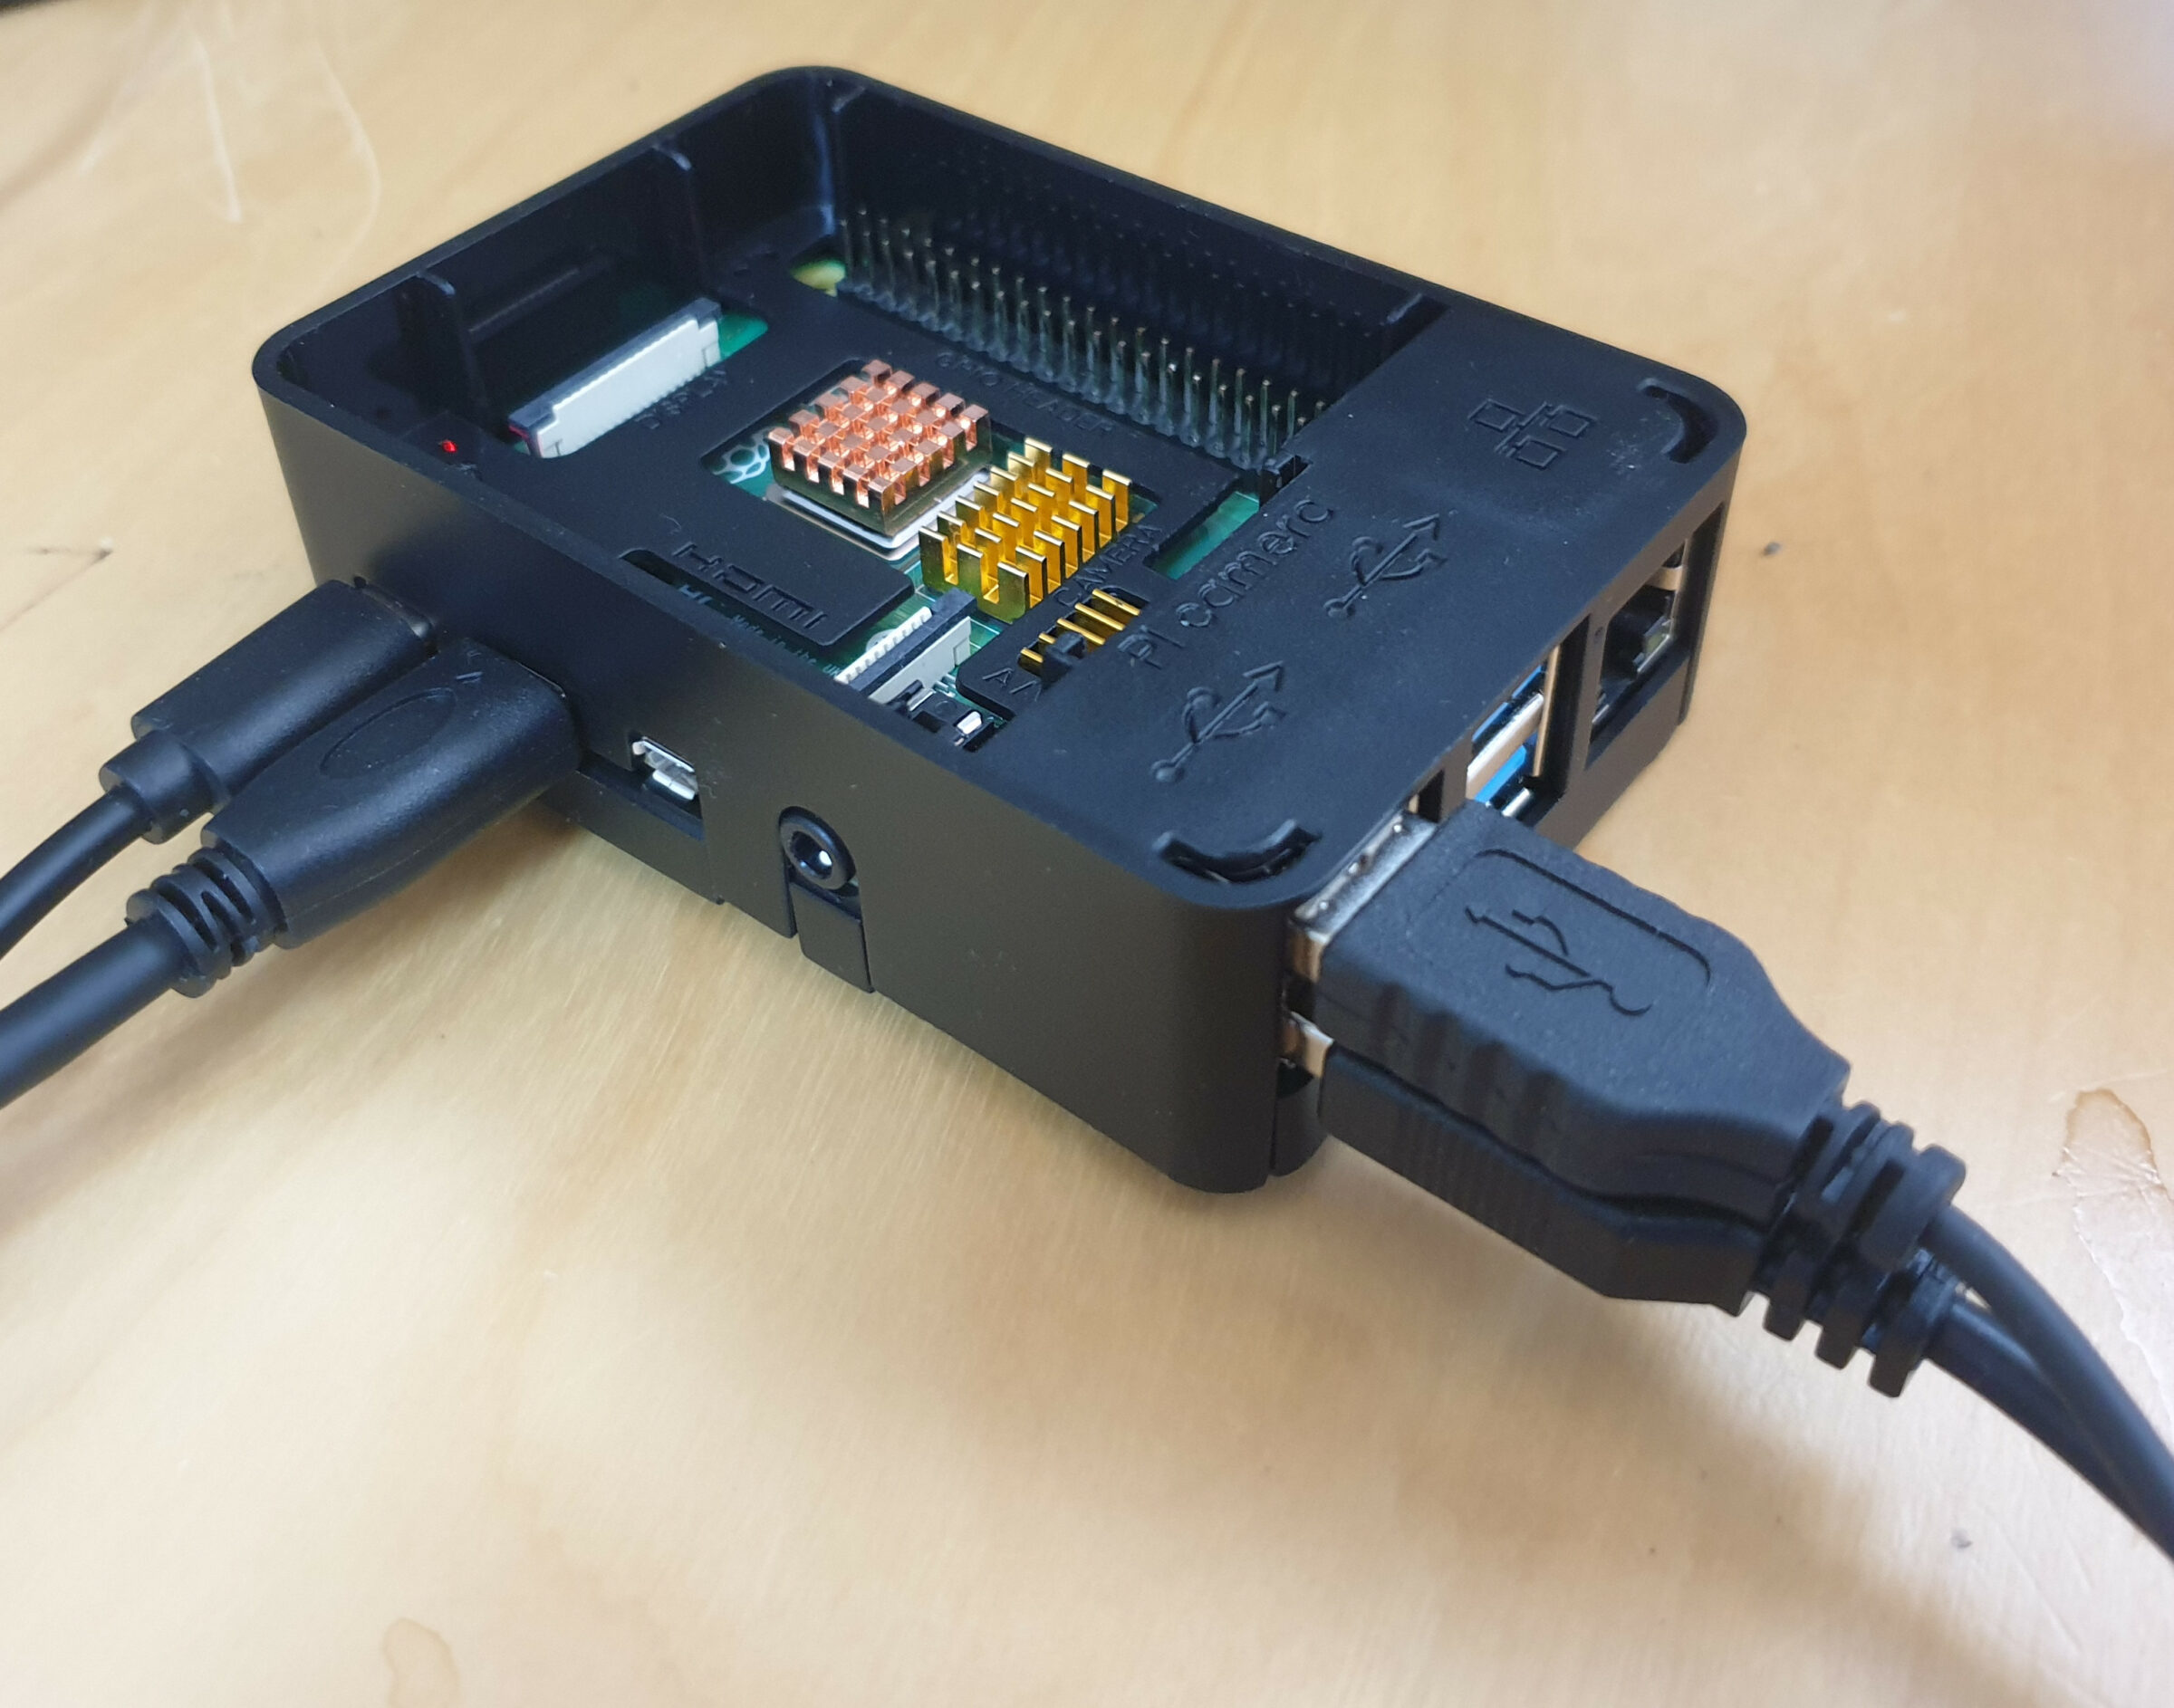
raspBerry Pi experimental board with ground- and middle cover. Left the USB-C connector with the power supply, one micro-HDMI connector with the screen, and the two USB-2 connectors with the mouse and the keyboard.
Then I switched the experimental board on.
The screen became active but the text appearing on the screen told me, that the software is too old, and this message started to repeat …
I pulled the micro SD card out again, transferred it with an SD-card adapter into an old SD-card reader, connected it to my unix-machine (a windows machine would also work) and activated the raspBerry site where the raspBerry Pi software is described.[2]
From this site you can download the ‚Raspberry Pi Imager‘ which is a very nice program. If You start it (linux as well as windows) you can download the newest version of the raspBerry Pi operating system on your SD card, pull them out and insert it again in your raspBerry Pi board.
Starting again with the new version, now it worked fine. Connected to the internet via Ethernet or Wlan you can update everything and then you can start working.
With the free USB-3 connectors you can connect other SD-card memories or even large USB-drives … and much more.
Adding a camera
For the experiments-chapter I will need a camera. Here you can get first information about the raspberry Pi’s cameras. I decided to take the new camera which offers a lot of capabilities.
The raspberry Pi camera module 2 with 8 MP (Mega-Pixels). I took the photo from the new camera with my smartphone, connected the smartphone with an USB cable to the raspberry Pi board and copied the photo onto the raspberry Pi. On the raspberry Pi I could format the Photo with the free gimp-software (which is not really necessary, but helpful) and loaded it up with my word-press blog software.
The specialty of the raspberry Pi’s cameras is that these are fully integrated in the hardware and software of the raspi.This enables completely new applications compared to a ’normal‘ camera which is only attached by an USB connector. This full integration is possible because there exists a whole bunch of software called in the older version ‚raspicam‘, now ‚libcamera‘, which can be used to work with the signals of the camera. The original sources for the camera are written in C++, but the user can interface with the camera by so-called camera-apps which offer complex functions for direct use, and one can write own camera-apps. But because the most used programming language on the raspi is the programming language python, there existed since the beginning a python library called ‚picamera‘ provided from the ‚outside‘ of the raspi development team. With the publication of the new raspberry Pi processor accompanied by a new version of the operating system (linux) called ‚bullseye‘ the old python picamera library doesn’t work any longer. One can still use it, but the future has another direction. The new ‚philosophy‘ of the rasp development team is nicely described in this ‚readme document‘ attached to the new version of the camera software called ‚libcamera‘:
„A complex camera support library for Linux, Android, and ChromeOS
Cameras are complex devices that need heavy hardware image processing operations. Control of the processing is based on advanced algorithms that must run on a programmable processor. This has traditionally been implemented in a dedicated MCU in the camera, but in embedded devices algorithms have been moved to the main CPU to save cost. Blurring the boundary between camera devices and Linux often left the user with no other option than a vendor-specific closed-source solution.
To address this problem the Linux media community has very recently started collaboration with the industry to develop a camera stack that will be open-source-friendly while still protecting vendor core IP. libcamera was born out of that collaboration and will offer modern camera support to Linux-based systems, including traditional Linux distributions, ChromeOS and Android.“
To write a completely new camera software in python is not a simple task. Therefore it needed some time to develop it and it is still not completely finished. But, luckily, the first experimental releases are there and do already function to some extend. While the messages from the development team in November 2021 have been rather announcements only, the massages from February 2022 sound differently. Now a new — yet still experimental — software is available by download from the github server. The new name of the old picamera library is ‚picamera2‘ and it is developed now by the raspi development team directly. Here you can find a download for the picamera2 document, which describes the whole library with installation descriptions.
Here you can look to a 10s video taken with the new camera modul 2 with the new — still experimental — python library picamera2:
from picamera2 import Picamera2 picam2 = Picamera2() picam2.start_and_record_video(„test.mp4“, duration=10)
Small 10s test video with functions of the new picamera2 python library.
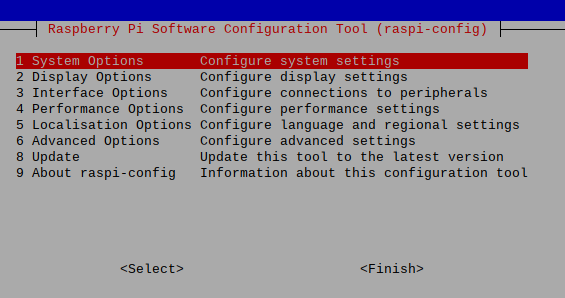
configure-tool
The simplest way to configure the raspberry Pi after the installation is to call the rasp-configure tool by typing into the shell:
gerdpi@raspberrypi:~ $ sudo raspi-config
Then the following screen will show up:
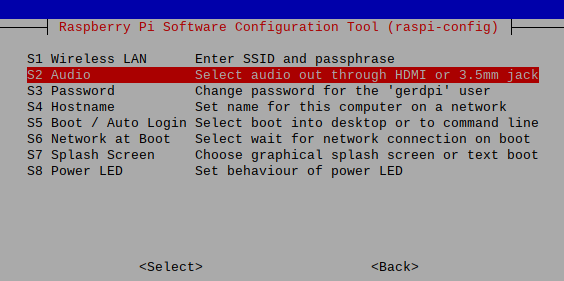
If you will use the audio-jack for your headphones instead of the loudspeaker of your screen you can select on the main screen 1. System options and then
you can select S2 Audio to make your choice.
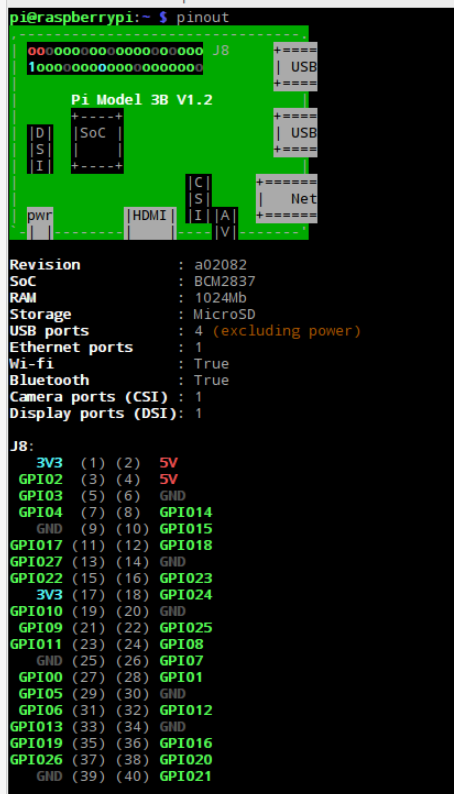
GPIO-settings
If you want later define some settings on the general input-output (GPIO) you can do this. Here is the GPIO outline:
[2] raspBerry Pi organization, software: https://www.raspberrypi.com/software/ or here, more simpler: https://projects.raspberrypi.org/en/projects/raspberry-pi-setting-up/1